Building School Spirit

Show pride in your school with two-color school spirit bows.

school spirit bows with personalized ribbons using grosgrain ribbon rolls
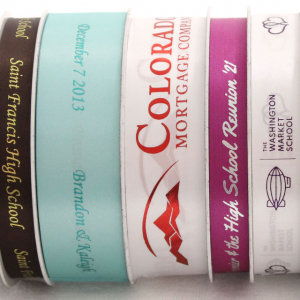
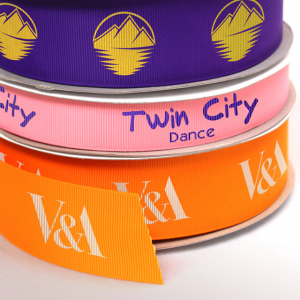
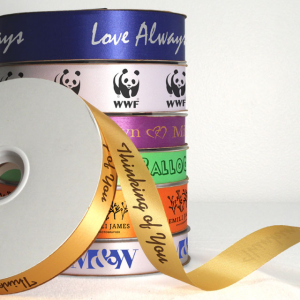
Perfect for school fund raisers, booster clubs, school bands, pep rallies or just for fun. You can use any color combination to coordinate with your school or favorite sports team. Take these school spirit bows one step further by adding a logo, saying or motto as a custom ribbon roll.

Each school spirit bow can be used in many different ways. Use them for chair decorations, hair ribbons or pom-pom accessories. And the best way to use them is by recognizing each student and helping them to develop positive feeling for themselves and the school. By helping all students to know of their worth, school spirit can be developed and shown in everything around the students.

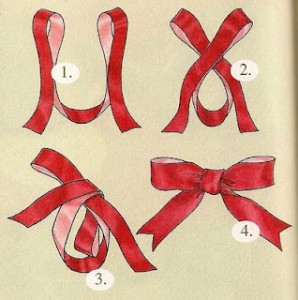
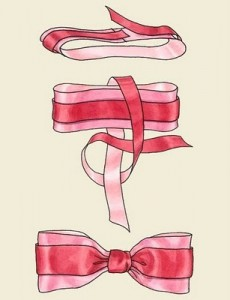
While there are many ways to make and shape this type of bow, this is probably the easiest: Classic Pom-Pom Bows.

school spirit bows with personalized ribbons using satin acetate ribbon rolls
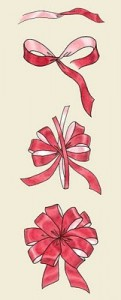
Pom-pom bows are the fullest type of ribbon bows. To make this bow, you will need two very long pieces of ribbon; they will need to be the same length. The longer the pieces of ribbon, the fuller and bigger the bow will be. Start by matching the ribbons together, making sure that each of the ends match up. This puffy bow is then made by wrapping the ribbon around your fingers or another device, such as a ruler. The main point on this bow is that the loops are uniform in size. Start with five or six wraps. To make your bow larger, spread your fingers or use a longer object. To make it fuller, add more loops. After completing the wraps of ribbon, fold the loops in half. Tie the bow in the middle with a coordinating narrow ribbon or wire. Separate the loops one by one to the right and left from the inside out. Twist each ribbon loop toward you as you pull it from the center. Make sure that the colors are alternating in your bow.

While most ribbon will work for this project, make sure to use a ribbon that will be of the appropriate size for your project. The thinner the ribbon roll is, the smaller the bow will be. Also, Floral Satin Acetate ribbon or DYNA Floral Satin ribbon will typically hold the bow shape better than an Organza ribbon or Single/Double Face Satin ribbon will.

How To: Canning Jar Gifts

Is it time to start thinking about holiday neighbor or group gifts? If so, check out these great ideas! And don’t forget to personalize them!

Vanilla-Brown-Sugar-Scrub The Frugal Girls Gifts in a Jar
I-Love-You-to-Pieces The Frugal Girls Gifts in a Jar
Hot-Cocoa-Mix The Frugal Girls Gifts in a Jar
Reeses-Chocolate-Cookie-Mix The Frugal Girls Gifts in a Jar

Canning jars can be used for other things besides flower vases. As scary as it sounds, it is coming to the point of the year when people are starting to think of great group gifts for the upcoming holidays. (Dare one say Christmas?) One of these group or neighbor gifts can be to create large quantities of homemade recipes that only require adding minimal liquids or perishables to make yummy homemade treats. The benefits of making these is that not only do you get to let people sample your recipes, but their homes will start to smell of fresh baking for the holidays. Examples for these homemade canning jar gifts may include (but, of course, are not limited to): hot chocolate, wassail or chai mixes, candy in a jar, cookie or cake mixes, or even a good sugar or salt scrub.

And don’t forget that those canning jars don’t just decorate themselves! While a canning jar itself isn’t something spectacularly beautiful, by adding satin ribbon to compliment the contents of the canning jar, you can really create something special. Add a personalized ribbon with a “Thank You” or “Happy Holidays” and let that neighbor know you really care. Or, add any message you desire to your personalized ribbon.

So, don’t forget to throw in your own personal touch by adding embellishments to your canning jars. Not only are you sharing your recipe and the joy of homemade goodies with those around you, but you can also create your own personal flair with these gifts. Go to it; decorate those canning jars however you want! Just don’t forget to use some personalized ribbons to really make these wonderful gifts really special and memorable.

How To: Canning Jars and Ribbons

No matter what the occasion is, when the urge hits to give someone flowers, keep in mind to never just steal them from your neighbor’s garden! Put some thought into the arraignment and make it a personal gift that will mean something for a long time with thoughtful personalized ribbons. And what better way than to make a personalized vase?

So, take those flowers from last week and create a home made project that is sure to please for years to come. We’re all into up-cycling anything these days. Why not incorporate all those old Mason Jars? While it isn’t required to actually use a Mason Jar, find a few of those old canning jars that are lying around your home. And here’s a couple amazing ideas to get you going in the right direction for that something special and personal. All you need is a canning jar without a lid and some scraps of ribbon!

Spring Tulips and Burlap Wrapped Mason Jars flower arrangements
gingham and mason jars a pretty cool life
mason jars with satin green ribbon and white doilies
flowers in clustered mason jars, held together with a ribbon

The simplest way to create a personalized masterpiece is an old canning jar, a wide strip of burlap and a favorite piece of old scrap ribbon. Simply wrap that burlap around the canning jar and secure down with a bit of hot glue. Next, take that ribbon and tie a pretty bow. It’s that simple!

Another way to create these simple vases is to just take a ribbon of your choice and wrap it around the top part of the canning jar. This example used gingham ribbon, but any ribbon will work. Make it personalized by ordering (or using some you already have) personalized ribbon rolls. Dress up this version with a simple paper doily wrapped around the canning jar before tying the ribbon around it.

The final suggestion is to arrange several canning jars together and secure them with a long piece of ribbon. Finish this with a simple, or maybe a more extravagant bow. Whether they be in clusters, like this example, or individual canning jars, these are sure to impress and be a keepsake for years to come.

How To: Gift Bow Tying

Gift bow tied around a box for a thank you present.

Gift wrapping keeps the secret of what is in the package until the perfect moment of unveiling, and we all love that moment of surprise when a present is unwrapped. Whether the gift is for a wedding, a baby shower, a birthday or some other get together doesn’t matter. We all like receiving and giving presents with flair and finesse. So, here are a few suggestions for tying that perfect gift bow using personalized ribbons.

Classic Gift Bow

How to tie a classic gift bow

The first bow, and probably the easiest to tie, is a classic one seen on many gifts. It’s similar to the bow we all learned when we tied our shoes as children. Start by taking a length of ribbon and creating two loops. Second, cross the loops, one in front and one behind. Third, bring one of the loops through the resulting hole (almost a third loop at the bottom). Finally, pull both loops tight and adjust, forming the bow. You will most likely make this bow with the same ribbon you wrap around the present or gift box.

Two Colored Gift Bow

How to tie a two colored gift bow

The second bow is a two colored gift bow. Make this bow separately and then secure it to the present or gift box. For this bow, you will need two widths and two colors of ribbon; let your imagination go wild! Place the skinnier ribbon on top of the wider ribbon and secure it in place, either by stitching or gluing it down. When completed, you should have a solid, single piece of ribbon. Fold the two edges into the middle of the ribbon to create a continual loop and glue the edges together. To hide these edges, take a smaller length of either ribbon and tie it around the middle. Pulling this ribbon tight will also gather the center to help create the look of a bow. Tie this off, or secure it with a small amount of glue.

Classic Pom-Pom Gift Bow

How to tie a classic pom-pom gift bow.

The third bow is a classic pom-pom bow with tails. Again, make this bow and then secure it to the present or gift bow. Pom-pom bows have many loops and are typically quite large, making them perfect for bigger gifts. To make this bow, you will need one very long piece of ribbon. Two-sided (each side is a different color) or printed ribbon is beautiful when used for this type of bow. Also, the longer the piece of ribbon, the fuller and bigger the bow will be.

Start by folding the ribbon in half to find the middle of the ribbon. Once you have the center, twist the ribbon and create a loop on one side. Do this for both sides until you have the same number of loops on each side with some ribbon remaining for the tails. Once you reach this step, take a smaller length of the same ribbon and tie it around the center of the bow (where you were twisting the loops) to secure the whole thing. Once it is secure, trim the tails so they are the same length, and then gently pull the loops apart to make the pom-pom.

Personalized Ribbons for Your Bow Tying

Decorate your gifts with the perfect ribbons. Order these imprinted ribbons with your custom message for wedding and baby showers, birthdays, anniversaries and so much more. You can also add logos for product branding, corporate advertising or retail packaging.