How To: Gift Bow Tying

Gift bow tied around a box for a thank you present.

Gift wrapping keeps the secret of what is in the package until the perfect moment of unveiling, and we all love that moment of surprise when a present is unwrapped. Whether the gift is for a wedding, a baby shower, a birthday or some other get together doesn’t matter. We all like receiving and giving presents with flair and finesse. So, here are a few suggestions for tying that perfect gift bow using personalized ribbons.

Classic Gift Bow

How to tie a classic gift bow

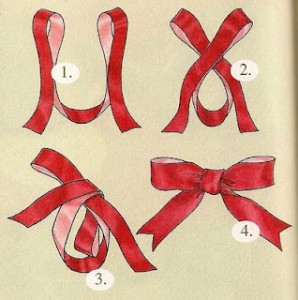
The first bow, and probably the easiest to tie, is a classic one seen on many gifts. It’s similar to the bow we all learned when we tied our shoes as children. Start by taking a length of ribbon and creating two loops. Second, cross the loops, one in front and one behind. Third, bring one of the loops through the resulting hole (almost a third loop at the bottom). Finally, pull both loops tight and adjust, forming the bow. You will most likely make this bow with the same ribbon you wrap around the present or gift box.

Two Colored Gift Bow

How to tie a two colored gift bow

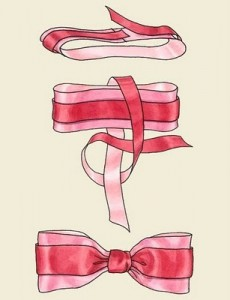
The second bow is a two colored gift bow. Make this bow separately and then secure it to the present or gift box. For this bow, you will need two widths and two colors of ribbon; let your imagination go wild! Place the skinnier ribbon on top of the wider ribbon and secure it in place, either by stitching or gluing it down. When completed, you should have a solid, single piece of ribbon. Fold the two edges into the middle of the ribbon to create a continual loop and glue the edges together. To hide these edges, take a smaller length of either ribbon and tie it around the middle. Pulling this ribbon tight will also gather the center to help create the look of a bow. Tie this off, or secure it with a small amount of glue.

Classic Pom-Pom Gift Bow

How to tie a classic pom-pom gift bow.

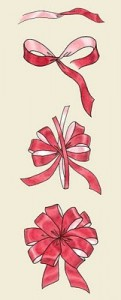
The third bow is a classic pom-pom bow with tails. Again, make this bow and then secure it to the present or gift bow. Pom-pom bows have many loops and are typically quite large, making them perfect for bigger gifts. To make this bow, you will need one very long piece of ribbon. Two-sided (each side is a different color) or printed ribbon is beautiful when used for this type of bow. Also, the longer the piece of ribbon, the fuller and bigger the bow will be.

Start by folding the ribbon in half to find the middle of the ribbon. Once you have the center, twist the ribbon and create a loop on one side. Do this for both sides until you have the same number of loops on each side with some ribbon remaining for the tails. Once you reach this step, take a smaller length of the same ribbon and tie it around the center of the bow (where you were twisting the loops) to secure the whole thing. Once it is secure, trim the tails so they are the same length, and then gently pull the loops apart to make the pom-pom.

Personalized Ribbons for Your Bow Tying

Decorate your gifts with the perfect ribbons. Order these imprinted ribbons with your custom message for wedding and baby showers, birthdays, anniversaries and so much more. You can also add logos for product branding, corporate advertising or retail packaging.

Summer Reading with a Ribbon Bookmark

Now that all the kids are out of school, what are you going to do with them? While your kids may have a favorite book or genre they like to read, many kids don’t like to read during the summer. And for many parents, this becomes a concern. So, how do we get them excited for reading during the summer? Two words: RIBBON BOOKMARK!

Getting Your Kids Excited About Summer Reading

We all like our kids to stimulate their minds while on summer break from school. And it entertains them so we don’t have to! Personalize your child’s reading experience with fun, creative ribbon bookmarks using customized ribbon rolls and your child’s creativity!

paperclips and ribbons bookmarksPAPERCLIP BOOKMARKS

Paperclip bookmarks are probably the fastest and easiest personalized ribbon bookmarks. Only two materials are needed for this craft. Simply, ribbon scraps and colored paper clips. Each child can pick whatever color combinations they want. Use one or multiple ribbons for this idea! Once the child has selected a paper clip and their ribbon, simply take a paperclip and, on the opposite end of where you slide it onto the page, slide a piece of ribbon through so that the paperclip is in about the middle of the ribbon scrap. Tie this into a knot and repeat this process with as many colors as you want. Once complete, the paperclip can be securely fastened to the page once the child has finished their reading for the day. This craft is especially useful for younger kids and it also teaches how to tie knots.

BUTTON & RIBBON BOOKMARKbutton and ribbon bookmarks using an elastic hair tie

Button bookmarks may take a little more time and creativity and are great for older, more DIY children. Material needed for this craft include buttons, needle and thread, ribbon, and an elastic hair tie. The first step on this craft is to measure your ribbon. Make sure that the ribbon is about twice the length of the book you want to use it for. Then place the hair tie on the inside of one end of the ribbon and fold the edge over enough to cover the band. Sew, or use glue for younger children, this down to secure the hair tie. One the other end of the ribbon, fold the fabric down the same way you did on the previous end. This step needs to be included to prevent any fraying of the ribbon. Place the button on the outside of the folded edge, making sure to leave at least a finger’s width from the edge, and sew together. Again, you can use glue for younger children or as a quicker option, just make sure that the glue holds down the fold as well as the button. Once this craft is finished, wrap the bookmark through the book and attach at the front wrapping the hair tie around the button. This is a great personalized look as you can mix colors and ribbon sizes.

braided ribbon bookmarksBRAIDED RIBBON BOOKMARK

Braided bookmarks are great for keeping hands busy for a while. These crafts are especially fun and unique as they teach hand-eye coordination as well as giving children a creative way to express themselves. The only material needed for this craft is two pieces of ribbon that are equal in length.

This ribbon bookmark can have two colors or one.

Start by taking one ribbon by the end and fold it back on itself to form a loop. Take the second ribbon and wrap one end around the base of the first ribbon’s loop, then tie it into a secure knot. Make sure to leave a short tail on each ribbon for the end of the bookmark. Note that the tails should be on the same side of the longest tail on the first ribbon. This step should also leave the length of the first ribbon hanging down. You should be able to gently pull on this longer tail to adjust the size of the loop. Once the knot is secure, form the second ribbon into a loop (just like the first loop you made) and thread it through the first loop and pull the first loop’s tail down to secure the second loop.

Make sure to leave this as flat as possible and not bunched. If it becomes bunched, you are pulling the loops too securely. Now that you have completed this, the rest of the project just repeats itself from left to right. So, at this point you should have a loop on the right side. Pull the right hand ribbon through this loop and secure it down with the ribbon on the left. Now you should have a loop on the left side. Repeat this process until you have created a the braid as long as you want. To finish the bookmark, instead of forming more loops, pull one side of the ribbon all the way through to create a free end. Pull the other end up to match this one and finish with a simple overhand knot. Make sure this isn’t pulled too tightly or it will smash the final braid.

Personalized Ribbon Greeting Cards

If you’re like many people, you may want to get a jump start on your gift purchases for the year. And one of the most important things is the need to keep the cost down, after all, we’re not made of money. This comes into play when you’re trying to personalize the gift to each person, and what better way to personalize than to make a card that comes from the heart. After all, it isn’t the gift they will remember, it’s the way they felt knowing it was from you.

So, why not make your gifts personal? Choose from a wide variety of our ribbon rolls and create your own home made cards! We have anything and everything (seriously, we have an actual “ribbon room” in our building)! Check out everything we have to offer on our website: www.personalized-ribbons.com.

Don’t set yourself short by limiting this to only birthday cards. Cards can range from birthdays to thank you’s and even include wedding invites and baby shower invites. We can print almost anything on our wide stock of ribbons. We also have several different ways of printing on them.

woven ribbon custom made note card
custom made thank you card using ribbon accents
custom made happy birthday gift card using custom ribbons

Use scraps of ribbon to create shapes for each card. These possibilities are endless; create Christmas trees, snowflakes, bunnies, hearts and anything else your heart desires. Use snippets from a ribbon roll with a personalized message. Messages can include happy birthday, thinking of you, happy holidays, and so forth. Each card becomes an individualized way to express yourself. Say you’re sorry, send best wishes for a special occasion, or just simply personalize the card just because you can.

When you add personalized ribbon to a card as an embellishment, it creates a 3D effect and makes everything stand out. Show your friends and family members that you really care by mixing in ribbons on your homemade greeting cards. Not only have you now created your own personalized cards, but you should still have plenty of the personalized ribbons to wrap any presents that coordinate with the card!