6 Reasons: Ribbon Rolls for Decorating

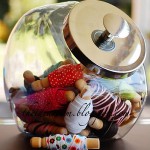
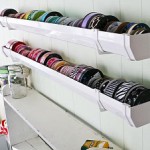
Are you planning an event and need ideas for decorating? From weddings to parties to most any event you can think of, ribbon rolls are the perfect answer for any needed decorations!

ribbon materials infographic for decorating usesSo, now you’re left with the unanswered question: what kind of ribbon do I want for my decorating? Here’s a quick guide to help you along your way to your perfect answer.

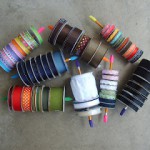
First things first, what do you need the ribbon roll for? Let’s look at all the things you can do with ribbon rolls. Tying them around things it a great use! Uses range from table decorations like candles and vases to the more traditional uses like gift wrapping and using them to wrap flowers into bouquets. Whatever you decide to use these ribbons for, that’s your stepping stone.

While most of these ribbon selections can be used for tying, some are prettier than others. But don’t discount ribbon types like grosgrain or organza quite yet. These ribbons have their uses too!

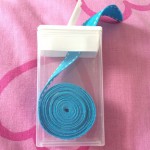
Satin and acetate ribbons are perfect for flowers and gifts. Tying bows is simple and they hold well. Tie them around your bouquets for that great looking bow. They hold their shape will so that the bow’s loops remain plush and open. These ribbons are also useful for decorating because of their shiny quality. They work great when hung with other decorations or used on centerpieces for tables.

Grosgrain
(This ribbon) is heavily textured on both sides. Consequently, the imprinting will have lines running through it where the color of the ribbon will show through. This can lead to a more casual or “distressed” look in the final ribbon. (And,) the material itself is slightly thicker and heavier than (other ribbons).

Chiffon – Organza
(This ribbon choice) has an open, mesh-like weave that allows you to see through it. Because of this transparency, …organza has a very elegant look, making it a popular choice for weddings or other formal events. It has a stiff texture that works well for almost any size bow.

Whatever you decide to use for your decorating, make sure that your imprinting choices match your ribbon choice. Printing on satin versus grosgrain, and even organza, will always show up differently. Watch your text and image choices when selecting your ribbons.

To make it a bit easier, simply review this information every time you need to choose your ribbon style and you can’t go wrong.

View entire infographic by clicking on the image. (Infographic courtesy of:
Melanie Bunch, Graphic Artist, Coller Industries Incorporated.)

DIY: Family Reunion Ribbons

Get creative this year with your family reunion!

It’s soon to be full on summer time, and typically that means a family reunion is on the schedule. Are you planning one this year? Here are some quick tips to help get the ball rolling.

invitations to your family reunion personalized with custom ribbon rollsDon’t forget to send out the invitations!
With this as probably the easiest step, make sure it’s done first and you don’t miss anyone. Make these invitations inviting and super special by including personalized ribbons. Simply print up your invitations however you would like and wrap a length of ribbon from a ribbon roll that has been customized with the family name or motto and the date of the party. Choose from almost any color and make it part of your theme.
Don’t want a traditional invitation? Try using a custom badge ribbon imprinted with all the details. Most of our ribbons can be printed with your choice of text or logos. Simply provide all the party instructions and details and choose your favorite color.

Badge ribbons are also a great way to identify people. Start with name badges so everyone won’t be guessing people’s names all day and attach badge ribbons to familiarize each other with how they are related. Create custom ribbons with words like cousin, aunt, sister or simply choose a last name to indicate which family line they originate from.

badge ribbons to help others at your family reunion know how they are connected

Another fun way to get people excited for the reunion is to personalize a custom ribbon roll with the family crest or use tartan colors. Even if you’ve never had a family crest, create your own and get it printed on a colorful ribbon. Use these wonderful ribbon rolls for decorations on tables, chairs and anywhere else you can come up with. Even tie them around favors for each guest to take home.

Rosette ribbons can also play an important part of your family reunion. Order each rosette with a title, placement or create your own custom rosette to present to winners of games and events that are held during your reunion. Give a rosette to everyone that participates or choose winners.

candy medals using personalized ribbon rolls for lanyardsDon’t forget to involve the kids in all the fun. From may poles using ribbon rolls to personal ribbon wands there’s a ribbon for everything. Here’s a cute idea: make kid awards using personalized ribbon rolls fashioned into a lanyard with a candy bar attached at the end for a medal. Choose any candy and any ribbon and make sure all participants get this coveted award.


No matter your ribbon choice, be sure to make this family reunion a memorable one with your own personalization. From names and dates to themes and mottos, the sky is really the limit here. Make it your own and have some fun. But don’t forget the sun block!

Creative Ribbons: Wedding Ribbon Rolls

Ever wonder what people really do with all those ribbon rolls?

Here’s an idea to get your creative juices flowing: wedding ribbons!

Time to bring out all those ribbon rolls again, and the project this time is weddings. Whether it’s for your wedding or a friends, ribbon rolls are at it again! You’ve incorporated these little gems into pretty much everything you’ve done for the wedding. From flowers to trinkets to decorations, these wedding ribbons are everywhere. Here’s a few more ideas to use up all those little strips still laying around.

While the traditional wedding throws rice or confetti at the departing couple, why not have something a little more clean up friendly? Create your own ribbon wands.double face satin ribbon wedding wands made from ribbon rolls

Such a simple project. Find a dowel that will comfortably fit an anyone’s hand. Each dowel can be painted to the wedding colors. Sand the dowels a bit so that there is nothing sticking out of them. Take the ribbon roll strips and trim them to the same size of the dowel. Choose as many as you want and secure them all to one end of the dowel. This can be done with either hot glue or adding a small screw to the end of the dowel.


single faced satin ribbon wedding ribbon rolls for bubble containersAnother great idea for sending off the couple onto their happy journey is bubbles. This one is especially a great idea if there are a lot of children, whether it be age or attitude, at the wedding. Find yourself some of those little bubble containers at a party store. Sometimes these come in colors or just clear. Either way, add paint, glitter or anything else to make it personal. Then secure a single strip from a ribbon roll around each container with a simple bow. What a unique and great way to provide trinkets for your guests to take home! You can even choose to add a little saying onto the container with a card or pen such as, “Blow bubbles of wishes, blow bubbles of fun, let’s cheer on the newlyweds as two lives become one!”

Double Faced Satin Ribbon and Rose Wedding BackdropThe final idea here is to take a bunch of the bridal flowers and secure them into curtain by hanging them from ends of strips of the ribbon rolls. Colors are especially fun on this one as you can make a great statement with all the colors of the rainbow or stick to the wedding colors.

Whatever your choice to finish up those ribbon rolls, make sure it fits with the mood of your wedding!

Creative Ribbons: Hair Accessories

Ever wonder what people really do with all those ribbon rolls?

Here’s an idea to get your creative juices flowing! Hair Accessories!

Time to bring out all those ribbon rolls again, and the project this time is hair bows and other accessories. While most of these don’t require a personalized ribbon roll, it doesn’t hurt to have them on hand. So, grab whatever you can and let’s get started.

ribbon rolls and hair accessories and bowsFirst, and probably the easiest idea is the hair tie. Grab a length of ribbon that will wrap at least twice around a pony tail. This length may vary depending on how much hair you intend to tie up in this ribbon. Secure the pony tail in an elastic. Once this is done and the pony tail is to your liking, simply wrap the ribbon around the pony tail to cover the elastic. Finish this look by securing the ribbon with a simple bow, much like a shoelace.


ribbon rolls and hair accessories and bows

This next idea will only take about five minutes to complete. You will need to hair elastics and a long piece cut from a ribbon roll. Simply join the two hair elastics with a simple knot. Once this is done, take your ribbon and measure the length needed. This is done by gently, but securely, wrapping the ribbon roll around your head where you will wear the headband once. Add one to two inches to that length and give it a snip! Singe the ends of the ribbon to avoid fraying. Then just wrap one end of the ribbon through one end of the hair elastic knot and sew it in place; hot glue is also an option to secure the ends. Repeat this process with the other side of the knot and the other end of the ribbon. And, you’re done!

ribbon rolls and hair accessories and bowsAnother super easy idea is to take approximately the same length of strips from a ribbon roll and secure them with a knot around a single hair elastic. Variate the colors on this project for a unique look, or use color combinations that go with holidays or specific outfits that are in your closet. These are super cute for little girls and they typically love the frilly look of this simple hair accessory.


ribbon rolls and hair accessories and bows
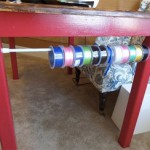
The last idea is super cute and also really easy! Cut three to four 5-6 inch pieces off a ribbon roll. Find the center of each strip and fold the ends in to meet each other at this point. Hot glue the ends to the middle of the ribbon strip. Repeat this process for each strip. Lay each ribbon on top of each other and fan out into a flower shape. Once this is done, carefully pull each layer up and secure them with a dab of hot glue. Line an alligator clip using another strip of your ribbon roll. Glue the flower onto the clip and add a colorful button to the center of the flower to complete this cute project.

While there are only four ideas here, there are hundreds other out there. Do you have a unique idea for hair accessories that you would like to share?

9 Creative Ribbon Storage Ideas

Is storage an issue for your craft room? Craft rooms don’t always have the right storage so can be cluttered with all of your ribbons, lace, scrapbook supplies, buttons and other items that we think you’ll use eventually. These items were probably purchased for other projects that ended up not using everything purchased or not using them at all.

Making Ribbon Storage more Friendly

Instead of collecting piles and mounds of these leftovers in various spots around the room, here’s some quick ideas to help you get organized with your storage.

ribbon storage using a tension rod
ribbon storage using a basket
ribbon storage using a shoebox

1. Make tension rods your best friend.

This is probably the easiest way to get all those ribbon rolls organized into one storage space. And, it’s as simple as it sounds. Add a tension rod between two table legs or in a door way and simply slide each ribbon roll on to display. This is a great way to also measure out how much ribbon you might need and with a quick snip, you’re done!

2. A-tisket a-tasket, find yourself a basket.

Finding the right basket is the most daunting task of this project. Once you do find the basket simply find a small dowel that will fit through the holes on the sides of the basket. Secure it through the middle of each ribbon roll and through each end of the basket. As shown in the picture, the final step is to thread the end of each ribbon roll through a hole on the side of the basket. And, voilà, you’re done!

3. Not with a fox, but put them in a shoe box.

Here’s another easy project to wrangle all your ribbon rolls into one place. Either purchase a box, use an old shoe box that you can re-purpose, or give yourself a reason to go get that new pair of shoes. Whatever your choice, simply decorate the box however you want and find, or make, an elastic that will fit all the way around the bottom. Stack your ribbons inside and secure each end on one side underneath the elastic. Close the lid and it’s almost like decorating your craft room.

ribbon storage using a pant or skirt hanger
ribbon storage using canisters or jars
ribbon storage using a straw canister

4. Treat ’em like a pair of slacks and hang them up!

Another great way to store all those ribbon rolls but keep them handy is to hang them up. Find a skirt or pant hanger with multiple bars and simply slide them on. Typically these hangers have a swinging arm to add and remove rolls with. Use a push pin or a nail into your wall and hang it up!

5. Like time in a bottle, canisters work as storage too.

Remember those old glass candy and cookie jars? You’ve probably wanted one for, like, forever! Why not splurge a little and finally get one. Use it to hold all your ribbon roll odds and ends. Wrap the ribbons around craft sticks or clothes pins or just stuff ’em all in. Not matter what, this storage idea will help your craft room look like a candy store in no time at all!

6. Store them with the straws.

Here’s another one to make you take a trip down memory lane. Remember those old straw canisters from the diners? Grab yourself one next time you’re at the store and make a pretty little display jar for your ribbon rolls.

A small section of a blue ribbon rolls stored in an empty tic tac box.
ribbon storage using pencils and erasers
Rain gutters that hold rows of ribbon rolls.

7. Keep them “minty” clean and use an empty Tic Tac or mint container.

While this only works with smaller and skinnier rolls, ribbons can still be rolled up tightly and slid into an empty Tic Tac container. Simply curl a piece of ribbon and pop it inside the container, making sure to leave the tail end hanging out of the lid a little bit so you can pull on it to cut off the desired amount. And don’t forget to decorate the little boxes and make them your own.

8. Line them up, like ducks in a row, using pencils and erasers and put them in a drawer.

Again, this one is just as simple as it sounds. Take a pencil, can be any color or any kind (number two work the best) and add a large eraser to one end. Line up your ribbon rolls and shove that pencil right through the middle! Secure a second eraser to the other end and throw the bundle in a drawer or it’s own little box.

9. Plug up your gutters with ribbon roll storage!

Instead of filling up a gutter with rain or leaves, mount them on the wall in your craft room and fill them with all those ribbon rolls. Paint or decorate them to match your décor or room color and hang them within reach to make the ribbon rolls easy to get to.

No matter your storage choice, keep your creative brain handy!

Do you have anything to add to this list? Let us know in the comments.