Getting Your Ribbon Collection Organized

Is your craft room a mess and your ribbon collection an absolute disaster?

From Tic Tac containers to an old shoe box, people have been trying for a long time to control their ribbon collection. Short of actually buying a ribbon rack from the ribbon store (which typically are not available for purchase), here are some quick do-it-yourself tutorials to get you started on that path to organization.

store your ribbon collection in clear drawers and plastic binsDrawers and Plastic Bins

Most of us have a few boxes laying around with our ribbon collection trying to escape. Whether those are old shoe boxes or packing boxes, they still need some tender loving care. First things first, get those ribbons all out of their boxes and sort them. Go with colors, sizes or how much is left, it doesn’t matter at this point. And then, instead of slipping them back into the dark cardboard graveyard, give them a lovely new home with clear plastic bins. But, don’t forget to get our your trusty label maker and give those bins a bright, colorful reminder of what’s in them.

store your ribbon collection in Wire Baskets and CD OrganizersWire Baskets or Old CD Shelves

Whether you get new baskets from your favorite container store or you find something at a local yard sale, wire shelves and baskets are perfect for ribbon storage. And getting your ribbon collection organized is quick and painless with baskets. Just toss in all your ribbon rolls, and you’re good to go. Or use a DVD or CD wire rack to hold the slimmer rolls in place. Both options can either sit on a desk or attach to a wall.

store your ribbon collection on Rods, Rings and DowelsRods, Rings and Dowels

This old standby is a simple, yet effective way to organize any craft room. Use rods or rings and slip them through the middle of any ribbon roll and hang them on a wall or in a closet. Rings are perfect for displaying other ribbon types, such as badge ribbons or award ribbons.

Or, with a few basic supplies like foam craft board and small dowels, you can create a storage shelf. Using the same technique as the curtain rod, slide your ribbon collection onto these dowels and stick the box almost anywhere you have space.

store your ribbon collection in chip cans or oatmeal canistersPringles Cans

Needing a quick, yet fun way of getting those ribbons under control? Well, next time you finish that can of chips, make a slit down one side and stuff in your ribbons. Although, you may want to wipe out the can first, as to not get chip crumbs on all the pretty ribbons. Is the chip can not big enough? Use an oatmeal can or something similar instead.

store your ribbon collection using decorative molding shelvesDecorative Molding

Using pre-finished moldings, make little shelves for all of your ribbon and other crafting needs. While this project may take a bit more time, the effort is sure to pay off. The molding makes the shelf look like it’s part of your crafting room. And, paint them to match or accent the walls!


But, no matter what you decide to do, these ideas will be perfect or your ribbon collection storage!

Adding Value To Old Canning Jars

adding value to canning jars with personalized ribbons

From unique vases to preserving your harvest, canning jar value isn’t complete without the help of personalized ribbons. Nowadays everyone is looking for ideas on how to reuse and recycle everything they can. From paper and plastic to tires and clothes, everything seems to have a secondary use and value. And canning jars are no exception.

While we don’t have all the answers for what these jars can be used for, we do know how to step up the game for using them to add value. And our answer is ribbons! So, here are a few excellent and creative ideas to get you going on reusing this great tool.

Decorating for Parties and Events

Whether you’re planning a wedding or a small backyard barbecue, or you need to refresh your home decor, personalized ribbons and canning jars are the perfect combination. Use these beautiful tools to help bring out colors in the room or aid in a party theme.

Lots of people like to use small canning jars as a reusable cup alternative. So, add some decorative ribbons to them to help with the festivities. Fun messages like, “Let Freedom Ring” or “Stars & Stripes” are perfect for a summer barbecue. Wrap small strips of a ribbon roll around the middle of each jar, and your party guests will feel your patriotic vibe.

use fun and festive custom ribbons and flowers to add value and reuse old canning jars

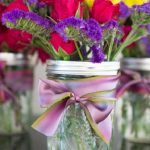
Canning jars are also a perfect substitute for vases. Just add water, your favorite flowers and matching personalized ribbons for a timeless look. These are perfect for a wedding centerpiece, especially when using the bride and groom’s chosen wedding colors. Tie the ribbons into bows and glue them onto the lip of the jars. And use wider ribbons for a fuller look.

Adding Value to Gifting by Using Jars

Housewarming gifts, holiday cookie recipes and DIY bath accessories are great gifts to put into old, clean canning jars. But here’s to taking adding value and taking it one step further! Add personalized ribbons with ribbon rolls wrapped around the lips or centers of each gift you give.

use a place rosette ribbon to add value to the top of a mason jar

Do you often give out a prize-winning recipe or jam? Add a fun rosette ribbon to the top of each jar. First place ribbons are the perfect choice for this fun twist on using custom ribbons with canning jars. Just trim off the streamers and glue the rosette to the top of each jar. Feeling a bit, as they say, extra this time? Order a custom center button with a graphic or special text and your gift recipients are sure to notice the extra effort.

So, it doesn’t matter what you put in your canning jar, just make sure you have a pretty bow on it! And custom ribbons are perfect for making every gift special.

Perfect Bows in 4 Easy Steps

From presents to pretty ribbons on centerpieces, ribbon bows are sure to make any event spectacular!

No matter what your use for ribbon rolls, whether it’s for a wedding or a corporate event, knowing how to tie a bow is extremely valuable. Here are a few easy-to-follow four-step ribbon bows to tie to meet any need you may have.

use single face satin ribbons for bows on candles and other centerpiecesClassic (or Traditional) Bow

The first bow, and probably the easiest to tie, is a classic, go-to look. It’s the same type of bow we all know from when we learned how to tie our shoes as children.

Step 1: Choose the desired ribbon length and form two loops.
Step 2: Cross the left loop over the right loop making sure that the ribbon tails stay in the back.
Step 3: Wrap the left loop around the right loop and pull it through the opening created.
Step 4: Adjust the tails and loops to the desired effect and tighten the knot.

Your bow is ready! Use classic bows for presents, candle centerpieces, utensils and other items that need to be held together, or that can fit into the opening created by forming this bow.

double face satin is perfect for dior bows and personalized ribbonsDior (or Layered) Bow

Not only are Dior bows extremely elegant, but they are also classic and useful. This bow works well with single face satin ribbons.

Step 1: Cut several pieces of ribbon from a roll making each strip two inches longer than the previous.
Step 2: Lay each ribbon piece face down and fold the ribbon ends to the center. Using double stick tape or glue, adhere these ends in place.
Step 3: Stack the looped ribbons one on top of the other starting with the largest on the bottom. Either use double stick tape or glue to hold them in place.
Step 4: Thread a long ribbon strip through the center loop and wrap it around whatever you are fastening the bow onto.

These bows are pretty attached to packages and presents.

satin acetate and organza ribbons for pew bows go great with personalizationPom-Pom (or Rosette) Bow

This bow is a classic pom-pom bow with tails. To make this bow, you will need one very long piece of ribbon. Personalized or printed ribbon is a nice look for this type of bow.

Step 1: Wrap the ribbon around your hand or another object 8 to 10 times.
Step 2: While holding the wrapped ribbon, use scissors to create a small notch on both sides of the center of the ribbon. Make sure to cut every layer.
Step 3: Secure the ribbon in the center by using florist wire wrapped in the notches.
Step 4: Spread out your loops to create a pom-pom effect. The longer the piece of ribbon, the fuller and bigger the bow will be.

This bow is fun and fancy! And, for an added touch, combine two pom-pom bows made from different ribbon types together for a pew or chair bow. The tails on these bows are great for accent pieces for presents and decorations.

So, no matter your ribbon, make sure to have fun with it. And now you can start creating perfect bows for anything.

Birthday Ribbons For Everyone!

From gifts to decorations, no birthday is complete without some ribbon!

Everyone has one. And most people enjoy celebrating it. So, why not help make every birthday memorable with some personalized ribbons! With so many uses, you are sure to run out of ribbon before ideas. But, here are a couple of fun and quick ribbon ideas to get you started.

birthday personalized ribbon topiaries for bright fun decorationsWhat’s a party without decorations?

Ribbon rolls look great when hanging personalized banners from ceilings and walls. Use these fun ribbons to wrap around chairs for party guests. And, while you’re at it, use some ribbon to wrap around tables, centerpieces and party utensils.

And don’t forget those balloons! Use fun, bright ribbons to secure those birthday balloons to a table or other decorative spot. Or, wrap each balloon with a festive and personalized message. Need an elegant look? Layer two different ribbon types like organza and single face satin to make your colors and message pop.

So, whether it’s a ribbon topiary that you created yourself or simple ribbon strips used for table scatter, let these ribbons work for you while you’re decorating for any birthday celebration.

using personalized ribbon rolls for your next birthday partyDon’t forget the gifts!

Make sure that every present at each birthday party will leave a lasting memory. Decorate and wrap all of your gifts with personalized ribbons. Create a unique keepsake with custom messages, the person’s name and their birth date all imprinted onto the ribbon. Take this one step further by choosing their favorite colors for each of the ribbons.

These birthday wrappings are sure to be a big hit! But, don’t just stop at the presents for that special someone. Are you planning on party favors as well? Use small strips of ribbon rolls to accent each favor so that everyone will remember this special day.

Finding success in your birthday ribbons is easy, so no matter how you decide to use your custom ribbons, remember one thing: have fun!

Keeping Kids Busy This Summer

School is out, and summer is here. Are your kids ready for all the fun and excitement that comes with this time of year? Are you? Here are some tips to keep all of your kids, no matter their age, engaged and active this summer.

Help your winner feel extra special with an easy DIY ribbon display.

frame award ribbons and hang any achievement from your kids

Did your child win a ribbon at a school field day? What about winning at a sporting event or academic event such as a spelling bee? Help them with creative ways to display their awards.

Find or create a unique frame that suits the award. A fun idea would be to add trinkets, pictures and other items that will remind the recipient how and what they won. While the colorful ribbons will draw the eye to the frame, the other pieces will keep attention and provide any continued recognition that might still be coveted.

Another fun idea would be to use a long strip from a ribbon roll and tack it to a wall. Once this is set up, drape any award ribbons from it to create a unique wall hanging. Or, fasten each award ribbon individually to a bedroom wall and decorate with stencils around the ribbon.

Getting kids involved in a summer reading program.

Check out your local library for some ideas and tips to get your kids reading. But, for now, get them excited with personalized, colorful ribbons. Have your kids create bookmarks with ribbon rolls, or get creative yourself with badge and full color ribbons.

And, don’t forget the awards. Everyone wants a fancy award for something they did great at, and be sure to include your kids! Make sure to award good reading habits during the summer with rosette ribbons or fun badge ribbons. Give them a reward that says “congratulations” or “good reader,” or create a unique saying.

Remember that when you are selecting prizes and rewards to use for a summer reading program, make sure they are both diverse and as inclusive as possible. Make sure to know how tactile your prize needs to be; if the reward ribbon is high in contrast, it will better suit a wide age range.

use homemade toys made with ribbons to keep kids active during the summerAnd, don’t forget kids need to have some fun both indoors and outside!

Using colored craft sticks or shower curtain rings, help each kid make a ribbon wand. Either glue or tape ribbon strips to one end of each stick or tie them around a ring. No matter the child’s age, they are sure to enjoy running around with these brightly colored toys.

Or, make awards using personalized ribbon rolls made into a lanyard. Then, attach a candy bar or other treat at the end for a medal. Make sure to choose treats and ribbons that will make all of your participants covet this award. Then, give these awards out for completing both indoor and outside activities. Make them run an obstacle course in your backyard. Or have them help around the house to keep things neat and tidy.

Do you have any other ideas on how your kids can benefit from ribbon use this summer?